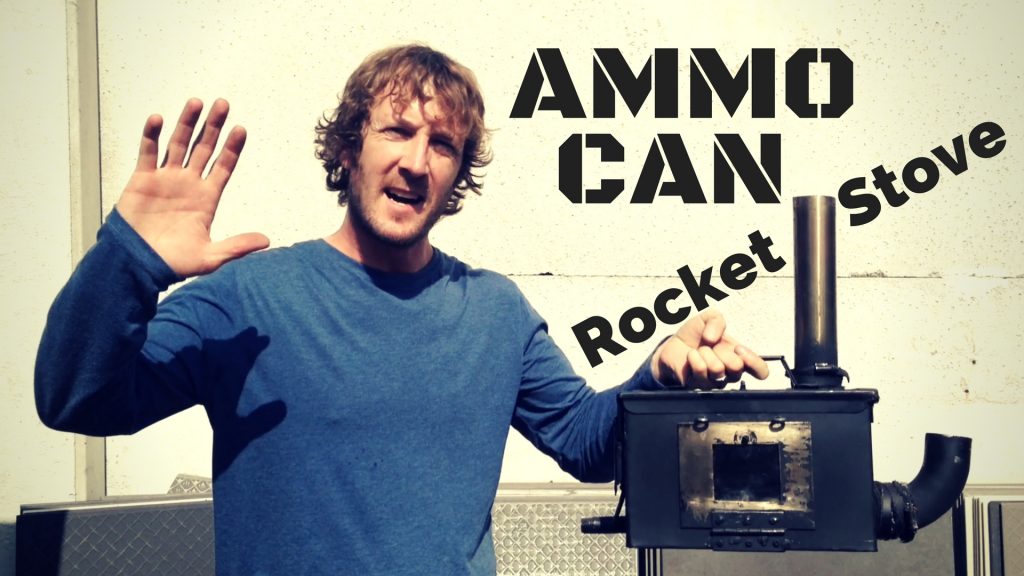
In this post I’ll go into detail about my ammo can rocket stove. This is a small, inexpensive homemade wood stove which burns wood, without smoke, thanks to it’s secondary burn system.
This all started as an experiment in small space heating. I was looking at ways to heat a 30 foot sailboat with a view to eventually using the stove to produce hot water for showers too. I had a look around for ideas and saw that some people were using ammo cans with which to make small wood burners. ‘Perfect!’, I thought: I was familiar with ammo boxes from my time in the Royal Air Force and I’d used them for many years as tool boxes. I was familiar with their size and structure and knew I could get them at a good price.
Whilst doing my research I came across rocket stoves, and I thought it would be nice if I could incorporate the some elements of rocket stove design in to my stove (such as being able to add fuel, without having to open a door, for example). I also saw videos about secondary burn and decided I wanted to incorporate that too! I set out making my first prototype to see what I could do.
As anticipated, the first prototype (Which I refer to as the Mk I) wasn’t perfect. Some elements of the design worked really well, and others definitely needed changing.
I built the Mk I before I’d started my YouTube channel so there is no video for this early prototype. I found the photo of it below though:
What you can’t see in this photo is the copper secondary air intake pipe. Copper conducts heat extremely well and this secondary air intake worked brilliantly. I could see the secondary burn taking place if I closed the door and just left a tiny gap to look through.
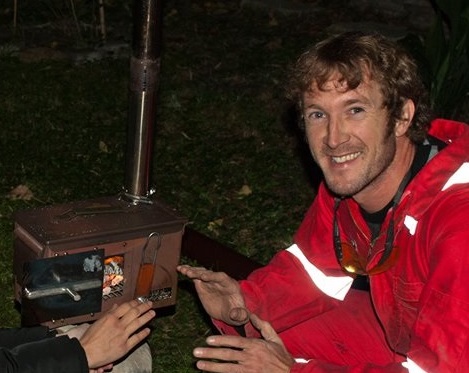
I then built the Mk II stove and made a video which I uploaded to my YouTube channel. This stove was improved in many ways over the Mk I. However, the galvanised steel secondary air pipe does not conduct heat as well as the copper did. For the Mk III, which I intend to build soon, I’m pretty sure I will go back to using copper.
The Mk II is made from a 50 cal standard NATO ammo can (also designated as a 5.56 mm NATO ammo can) The dimensions are (L) 11″ x (W) 5 1/2″ x (H) 7″ = (L) 28 cm x (W) 14 cm x (H) 18 cm. You can buy these ammo cans on Ebay or Amazon, as well as from military surplus stores and illegal international arms dealers. I threw that last one in there just to check that you are paying attention… If you want to buy one (or a couple as they make fantastic portable tool kits too) you can buy them here: https://amzn.to/2BkRDLl
The stove has the following characteristics:
- An insulated, double-skinned construction. I used a steel liner to make an internal box within the ammo can and filled the gaps between the two skins with rockwool insulation. This retains heat in the stove and creates the conditions necessary for a very hot and clean burn.
- A stainless steel door, with a clear mica viewing window. The door is welded to the ammo can via a hinge and has two locking mechanisms. One is a rotary latch which quickly closes and keeps the door closed. The secondary locking mechanism really squeezes it closed. This is achieved by two eye bolts, each of which is actually the end of a turnbuckle. By rotating each eye bolt 1/4 turn (using a metal rod as the eye bolts are hot!) the door can be locked shut. The mica viewing window is loosely held in position within the door by a welded step underneath and two strips of steel bent round into a V shape. These lightly push against the mica to hold it in place, but at the same time allow for differential thermal expansion and contraction.
- An internal baffle, which directs the flame and combustion gases from right to left when viewing the stove from the front. This prevents the smoke and gases from going straight up out of the flue and creates the conditions for secondary burn to take place.
- A galvanised steel secondary air intake, which draws external air in to the stove, heats it and then releases it into the zone just below the baffle where the secondary burn takes place. This ignites the combustion gases and smoke a second time and these gases burn all the way back from left to right above the baffle, before being allowed to escape up the flue.
- A large air / fuel intake on the right hand side of the stove acts as the primary air intake and also as a loading area for fuel. This can only be used once the stove is up to it’s working temperature and a strong draw (updraft) is created – if you were to try to start the stove from cold through here, it wouldn’t work because the smoke would not be drawn into the stove, (unless you were to preheat the flue in some way).
- One small flue section is attached to the stove. The other flue sections are removable. Making the stove the way I did there is no need to seal the large diameter outer flue against the smaller diameter inner flue. Whilst the stove is in use the large diameter flue heats up and creates its own draw, which sucks in cooler air from below and directs it up and out of the top. The smoke from the smaller diameter section of the flue is therefore drawn up and out and I have never experienced any problems with smoke coming out of the open bottom end of the flue.
- The bottom of the stove has a simple grate made of chicken wire. This raises the burning wood, allowing air flow underneath it to allow all-round combustion.
Now that I’ve described my Mk II ammo can rocket stove, lets have a look at it.
Below you can watch my YouTube video ‘My ammo can stove. A homemade wood stove (rocket stove) with a secondary burn system.’
As you can see, this stove (once hot) burns wood without producing smoke. Smoke from any fire is indicative of an inefficient burn. If you see a wood burner burning without smoke, it means that the smoke that you would expect to see is instead being fully combusted within the stove. As well as being more efficient and reducing pollution, this also means that the stove is far less likely to have problems such as chimney fires, caused by creosote and other residual deposits, which are created by the conditions inside colder running stoves.
I’ve had a lot of interest in my Mk II Ammo Can Stove and a lot of comments on YouTube asking me to make the build video I talked about. I will definitely be doing this and I plan to make the Mk III version:
- Easy to build with simple tools (no welding required)
- Cheap to build
- Made using commonly available parts
I have a lot of work ahead of me but I hope I can do a good job with my Mk III stove. I had the following comment from a YouTube viewer:

‘Diamond Draco’ wants me to make the build video to help them out and that is certainly a reason for me to get my skates on! As a result of this comment I have decided to make an interim video, explaining exactly how I made the Mk II. This will help people who are in a rush to get their stoves built to do so whilst I’m still working on the Mk III video.
*Update December 2016: Build video now live, see this post
Please leave your comments below.
If you enjoyed this post, share it on social media to help me support my family.
Cheers!
Chris 👍
![]()


Hello Its Jo here from french-stoves.com
I am working on a rocket stove design using an antique french woodstove. But, like you, am getting sidetracked by more urgent things. I am looking for a design/designs for rocket stoves to send to a team of volunteers in Greece helping a million refugees keep warm…ANY designs using uocycled materials will be much appreciated. Messenger/facebook jo blick skype jo_blick email blickjo1@gmail.com x
Hi Jo,
I am working on the Mk III in this period and I think it will be very useful for many situations, including humanitarian relief. I would be interested to know if wood pellets would be the ideal fuel ideal for humanitarian relief (easy to source, transport, store and distribute)… Please can you provide further details on the team in Greece – are they working for a particular charity? In the meantime, if any other readers here have designs of suggestions, please send them to Jo.
Cheers,
Chris
Hey Chris!
How is the MKIII stove coming??
I am in a build now and I am waiting to see the MKIII before I proceed.
If you could just send me the specs on your build even if it’s not completed that would be awesome! I love the combo of the MKII and MKI!
Hi Kord,
the Mk III is still in my brain and life is extremely busy so I don’t know when I’ll have the time to get the stove and plans out to people.
I hope I can find the time to do it in the near future as I know a lot of people would love these stoves.
Cheers,
Chris 👍
Hey Chris, we need to MK III! THIS IS AWESOME. Please take the time to make the video for it! Us Tiny house goers need the heat!
Respect from Canada
Hi Chris,
Thanks very much for your passion and creativity!
It is my 40th birthday! and as a present for myself and my community I want to make a light weight portable sauna/sweatlodge during this year,I want to be able to create a sauna that can be carried by one or 2 persons into beautiful places with wild water for plunging into!………..I have started along the “yome” structure route of a hybrid of yert and geodesic dome qualities…………but it is this NATO ammo box beauty that I have just fallen in love with!
I particularly like the rocket stove part of this, and have had some thoughts around this part of the project for the MKIII:
The possibility to extend the tube so that it is drawing air from outside the sauna, but make it also safely removable so it can still be used to add fuel to the fire?
Could/would the rocket tube mentioned have to be a wider diameter if it was going to be about 500mm longer?
Could/would the secondary burn tube have to be a wider diameter if it was going to be about 500mm longer?
Also how is the MKIII stove going?
Best wishes,
SID
Hi Chris, first of all I wish that you, your family and loved ones are doing well. Also I want you to know that my name is Tommy Cruz, SSG U.S. ARMY RETIRED and also a Disabled Veteran currently living in Kansas with my wife and my little boy Nicholas who is 10y/o. We love the outdoors and I was researching about portable stoves when I came across your YouTube video, and I have been amazed ever since. You are a brilliant and now my number one hero because you have brought my little boy and I much closer by attempting to build our first rocket stove and thanks to you not just any rocket stove but an ARMY/NATO ammo can stove. I loved your video and we will like to ask for your help please, do you have a build video or build plan of your MKII that could help my son and I to build it right, we would greatly appreciate it very much. Also we wanted to commend you for your intentions of helping people and finding/looking for ways and applications for humanitarian relief. God speed to you in all your endeavors and may his love and blessings be bestow upon you and your loved ones, looking forward to hearing from you
Thanks,
Nicholas and Tommy Cruz
Hi Tommy,
thank you very much for your comment, I can’t describe how satisfying it is for me to read. I am feeling very blessed and I hope that you and your family are looking forward to spending a wonderful Christmas together.
I am working on the design for the Mk III stove at the moment and I hope that this will be a great stove for people to build, using very simple tools and with low-cost, easily obtainable parts. It will take me a while to release the Mk III, as I want to make the whole thing as professionally as I can and I also want to produce some decent build instruction documentation. I will be making an interim video where I dismantle the Mk II and describe exactly how I made it. I hope to be able to upload this very soon so I hope you will have all the information you need for you and Nicholas to build a fantastic NATO ammo can stove! As far as helping people out is concerned, you have helped me massively with your comment: It has proved to me that the most efficient thing I can do to help others is to make my videos and get them on YouTube, so that they are available to everyone. In this way I can help whoever wants to build one of these stoves, for whatever reason.
It makes me very happy to picture you and your son working together to build your stove. I have very precious memories of ‘tinkering’ with practical projects with my Dad when I was a kid and I will cherish those memories forever. I have no doubt that you will always be Nicholas’s number one hero.
Well Staff Sergeant Cruz, I had better get to work! Watch this space for new videos and please keep me posted with your build progress – I’d love to hear how you get on.
Very best regards,
Chris
I almost have all the parts to put mine together. Looking forward to a warm shop.
Hi Richard, these are great little stoves – I’m sure you will love it!
Cheers,
Chris 👍
Hi Chris,
I really like your Ammo Box Rocket stove heater design with the secondary burner.
As I was looking on YouTube at other videos I came across this guy who has some very good design features in his Ammo Box stove design, that you might consider incorporating in the MK III.
I especially like his door design and heat shields to protect the ammo box from damage, Some of these design features could easily be incorporated in your stove.
Here is his you tube link: https://www.youtube.com/watch?v=-w7JQIGlNko
Keep up the good work!
Hi Paul,
thanks for the heads up – I’ll check it out when I get a chance.
Cheers,
Chris 🙂
I was thinking of making a rocket stove but with thermal store to recoup all ( most) of the heat from exhaust gas. All the other designs had pipe diameter burn chamber till I saw your video today. It’s one of best design ideas to burn all gases. 1. I think if you fit a water jacket or water pipe at top of chimney to recover some waste energy. 2. Fit a vertical pipe on base with can for ash. 3. A straight shallow angled in put pipe so you can add fuel like long sticks as well.
Your stove will be nearly there..
I thank you for sharing your great ideas.
PS cost of amo box is nearly £90
Im looking to put some kind of wood burning stove for heat inside my van for when Im on a trip in the winter. Do you think that if I piped the flue out, either through the roof or out the window, and with a bit of ventilation, this setup could work?
Also, do you sell these already made?
Good info and videos.
Thanks and my Best to you.
Sashi.
Hi Sashi,
yes, this would be perfect for a camper van. As you say, there are several options for where to take the flue (permanently set up or removable depending on your usage). You will need adequate ventilation and a CO detector to stay 100% safe.
I don’t sell these ready made as I have a ridiculously busy life and there are already nowhere near enough hours in the day! The MKIII and plans will be coming at some point but don’t hold your breath!
Cheers, Chris
Hi, well done mate, just this minute seen your ammo can stove II video, its nice to watch a competent project completed by someone from the uk, youtube is brimming with Americans, admittedly there are more of them! I have used for some time the Bean can type mini jet stoves and experimented with some success in a camper/camping sinario, but the ammo can use is so blatantly obvious i missed it! So major thanks for that. The ammo can will provide the durability i require, the bean cans typically 3 or 4 uses and gone, I think I’ll use s/s for the baffle and second burn air injector, i have some scrap 1/16th & 1/8th 316 s/s plate and some 1 & 2″ 304 s/s pipe and fittings, of course recovered from a skip with permission. My personal bug bear is cleaning the things out easily and quickly, and this is the area i wish to concentrate on, possibly inverting the whole thing, using the lid as a removable bottom? Anyway great video, wish you the best with your randomnous, I’ll be catching up on your other stuff!
Hi Darren,
thank you for your comment. These ammo cans can be very durable, depending on the design of the stove, so it sounds like they might be a great solution for your use. Emptying the ash is a piece of cake on these stoves: A) Because there is hardly any ash to empty in the first place (The stove burns so efficiently that there is very little ash left over from the fuel); and B) The ‘lid’ of the stove can be removed in about 10 seconds and the bottom part of the stove inverted to empty what little ash there is into a container.
Good luck with your build and I hope you will enjoy the MK III when that is ready.
Cheers,
Chris 👍
Hi Chris,
Love your stove and was wondering when III will be on Youtube? I’m glad to hear you’re still working on it but I can’t wait…winter is coming!! lol
Hi Anita!
I do have plans for the Mk III but we have a newborn baby (Our first, a girl, Emma!) and time has become an extraordinarily scarce resource! I hope the Mk II will be ready before the Dothraki arrive… 😀
Cheers,
Chris
Hey there Chris I want to first thank you for the video. I built my stove yesterday just the way you have. Only differences I have a much larger ammo can. About 3x larger I would say. I used 1/2 inch galvanized steel pipe for the secondary air intake and burn system. And I used 2 1/2 in. Pipe for cheminey and primary air intake. The thing smokes like crazy and the secondary burn system will not ignite. Do you have any advice to make my stove more efficient.
Thank you again for the video and I hope to hear from you soon.
Hi Josh,
it’s not easy to achieve the secondary burn that I got on the Mk II. There are all sorts of considerations regarding airflow, insulation, surface area, flue length (as well as diameter). I’m sure it would be possible to achieve an effecient secondary burn but I wouldn’t be able to tell you how without seeing your stove and doing some experimenting myself. Hopefully the Mk III will meet your needs perfectly when it comes.
Cheers,
Chris 👍
Great work. looking forward to seeing the film of how you built it 🙂
Thank you Ulf, I have the Mk III all planned out, i jut need more time in my life right now!!! Cheers, Chris 👍
Hi Chris,
Have you thought about turning the can upside down and using the top for the bottom so that you can open it to empty the ashes out of the stove easier. Can save time when cleaning out ashes. Thanks for letting me share.
Chris,
What keeps the secondary burn pipe from flopping around under the heat shield? How do you keep it up under the heat shield?
How can you use copper pipe for the air intake without having to silver solder the joints? Regular solder would melt under very hot temps.
I know, I could talk your ear off.
Gary
Hi Chris love your idea.. but a little concerned it’s taken like 2-3years for you to get your ideas out of your head… I know it’s been awhile if not going on three years while we wait…I know life throws us curve balls but how passionate are you about the mk III and helping us get to fully understand how you made this and how to go threw a step by step tutoring video…..if your not willing to show a mk 3 then could ya do a video on a brand new one one of the mk2 where you put together each part starting with a empty ammo can and work your way up to the end of the video and how it all works together please I been waiting along time now thanks