Do you have a seized / stuck / frozen brake on your car? Or is one of your brake calipers leaking hydraulic fluid? Well, the good news is, there is an easy and cheap DIY fix, and this website post , along with my associated video, will show you exactly how you can go about fixing either of these problems yourself.
Brake calipers take a lot of abuse. They sit low down on your car and are subjected to a constant spray of dirt, grime and salt water whilst you are driving in the rain. There is a large rubber gaiter-type seal which allows the cylinder (the moving part of the caliper) to move in and out of the piston (the fixed part of the caliper). This stops the dirt and grime from being drawn in to the very fine-tolerance gap between the piston and the cylinder. Eventually, this seal will break down or crack, allowing dirt to enter the piston/cylinder area, and this is where deterioration starts.

Gritty particles (some minute, some of a larger size) get blown into the gaps in the outer seal, and then stick to the grease below. Over time this becomes a kind of lapping paste, and this abrasive mixture will get drawn in between the cylinder and the piston every single time you apply or release the brakes. The protective coating on the piston is usually the first thing to wear away, and then the outer edge of the piston will start to corrode. As the tolerances here are so fine, it only takes a small amount of corrosion to make the piston get stuck in the cylinder.
Often, the brake pressure generated is powerful enough to overcome the friction, so the brake concerned will be applied as normal. However, it is the deformation of the square-profile-seal, which stores a tiny amount of energy (and which under normal circumstances returns to its original shape) that releases the brake by bringing the piston – and therefore the pads – away from the brake disc. In the above corroded piston scenario, the square profile seal is not powerful enough to overcome the friction created by the corroded piston sliding within the cylinder. This is what causes a brake to stay on when you release the pedal, which may be noticed due to a squealing noise from the brake, or in extreme cases, visible wear and overheating on the disc in question.
In other cases, the gritty mixture may score the square-profile seal on the piston, causing a leak of brake fluid. This is more rare than a sticking brake, but it can happen.
So how can I fix this brake caliper problem?
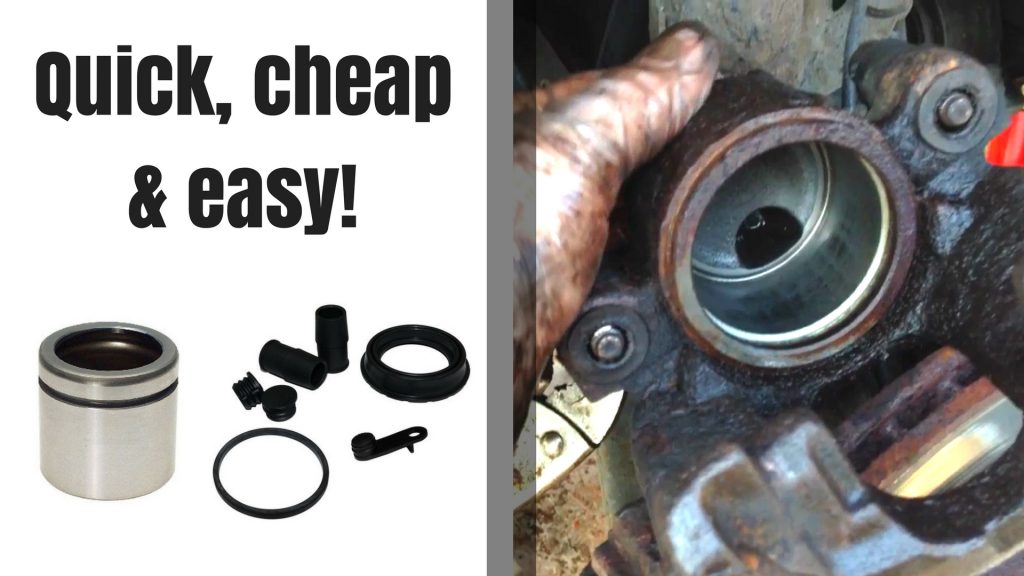
Luckily, this is pretty easy! You can buy brake caliper repair kits (on Ebay, for example), which are very cheap and have all the parts you require to fix the above problems. Just search “Your Car Model + Brake Caliper Repair Kit” and you should find one quite easily. I paid around $25 for ours, which, as well as including all the seals and lubricants, also included a brand new piston, saving me a lot of time and effort as I didn’t have to remove all the corrosion and clean up the old piston.
When I did this job I was in a mad rush to get the car back on the road. (Not being able to jump in a car and go wherever I like at the drop of a hat drives me insane!) and at our house in the UK, we don’t have a garage or workshop. So, because it was convenient for me to refurbish the brake caliper in-situ on the car, that’s exactly what I did! I disassembled the caliper, cleaned everything up, replaced the necessary parts, then rebuilt the caliper, without even disconnecting the brake line! If you have a garage or a workshop then you might want to remove the brake line at the caliper so you can work on everything in a nice clean, dry, well lit environment (perhaps with your favourite music playing in the background and a nice steaming hot brew sitting in front of you…) but if I can do it on my knees in my drive, then you should have no problem doing it whatever your work area is like…
Here is a quick overview of the job:
- Jack up car and support on axle stands (After ‘cracking’ wheel nuts)
- Remove wheel
- Unbolt caliper from vehicle (Usually one fastener on the top and one on the bottom)
- Remove brake pads
- Remove piston from cylinder. My way of doing this is to just pump the brake until the piston is pumped out of the cylinder by the brake fluid.
- If you have a means of depressing the brake pedal, you can leave it semi-depressed from this point until after the new cylinder is fitted. This will stop brake fluid from draining out. Alternatively, you can risk the wrath of half the universe and (dum-dum-dum!) clamp the brake line. :-O [I’ve never seen problems with clamping a brake line and to be honest, if your brake line gets damaged by clamping, then that means it was old and knackered and it was time to replace it anyway (and the other side while you’re at it). In my mind it is better to discover this whilst working on your car than it is whilst braking hard on a motorway, so I don’t see the ‘stress test’ of clamping a brake hose as a problem. Some people will disagree with me and that’s just fine. Adults can agree to disagree and respect each others opinions! [By the way, I have a fair bit of hydraulics experience – check out my about page to find out more]
- Remove outer gaiter-type seal
- Clean up mating surface where the new seal will engage
- Remove internal square-profile seal
- Clean up inside of cylinder with new brake fluid and a lint-free cloth
- Lubricate and install new square profile seal
- Pre-install the outer gaiter seal onto the new piston
- Push new piston in place, making sure it goes in nice and square
- Engage the outer edge of the new gaiter seal onto the chamfered edge of the caliper body (*Top tip: Start at the hardest edge where you have the least working room. This allows you to do the final [hardest] part where you have lots of access and you can see what you are doing.)
- Remove slider pins, clean and lube as necessary
- Replace rubber grommets
- Refit brake caliper and pads onto car
- Bleed brakes (topping up brake fluid as necessary. Start car and test power-assisted brakes for ‘sponginess’ indicating residual air in system)
- Refit wheel
- Remove axle stands and lower car
- Fully torque wheel nuts
- Test drive car
Did you fix your brake?
Yes of course! We bought this car at a very good price when it was 15 years old (£650 which equates to around 830 USD) and it was 18 years old when I fixed this brake caliper. The caliper is still working perfectly and I expect that the car will be sent off to be recycled well before the repair will ever fail!
Do you have a step-by-step brake caliper repair video for me?
Well it just so happens that I do! Below you can watch my video ‘Alternator Troubleshooting and Repair (with simple tools)’ below:
There we are then! Instead of forking out a lot of money for a brand new brake caliper, you can repair your own with a $25 repair kit (this price includes shipping) and the job should only take you a couple of hours.
Has this post given you the confidence to repair your own brake caliper? Or has it put you off for life?! If you have any feedback, comments feedback or suggestions then let me know in the comments section below!
I hope you found this post useful. If so, please share it on social media. 😉
Cheers!
Chris 👍
![]()


Leave a Reply